
- Updated on
How to Reduce AI Coding Errors with a Claude TaskMaster AI, a task manager MCP

I've shipped an entire image generation app: ImgxAI ― without (almost) writing any code.
In this tutorial, you'll learn how to do it too and drastically reduce AI coding errors in Cursor, Windsurf etc. and better use AI to code as your codebase gets more complex.
By the end of this article, you'll set yourself up for success when using AI to code.
If video is your jam, here's a full tutorial on YouTube:
The Vibe Coder FOMO
You see vibe coders going around the internet saying they made an entire app in hours.
But when you try it, the AI writes some slop and then you end up reaching the only reasonable conclusion:
It's not there yet.
That's wrong.
These people have set up some tools that we haven't heard of yet. They have the time to craft perfect prompts, and then make prompts that generate prompts worthy of getting DiCaprio to film part 2 of Inception.
But there's a problem.
That's their lifeblood.
I haven't found a single video or article that shows all prompts and tools they use.
At best, you need to subscribe to a shady newsletter or pay a membership to access the promised land of AI growth hacks.
So I'm here to change that. I'll share it all. Prompts, outputs, tips, the works.
Let's dive into it! 🏊♂️
What you'll learn
In this tutorial, I'll show you how to set yourself up for success when coding with AI.
So what is it? The backbone of this approach is a MCP server that you can run in your text editor (Cursor, Windsurf, etc.) and a handful of prompts needed to use it. This MCP server helps you manage tasks that the AI can work on.
We'll cover:
- Writing requirements
- Creating a PRD file (and prompts)
- Setting up the task management system via MCP
- Coding the app (prompts and task management)
Finally, we'll look at using this system to also solve complex bugs (introduced by either you or the AI).
1. Writing requirements
Obviously, the AI doesn't know what you want build. Ideally, you'll spend 10-15 minutes on this step, writing as much detail as possible about the app you have in mind.
Be sure to include:
- App name
- Tech stack
- Core features
- Database
- API integrations
- Design style
- Things that you don't want to build
- Ask it to research a comparable, existing app (if applicable)
We then take these and head over to ChatGPT (o3 or better recommended) and ask it to:
I would like to create concise functional requirements for the following application:
...
Output as markdown code.
Here is a complete example:
I would like to create concise functional requirements for the following application:

The app is called ImgxAI and is a midjourney clone, but using OpenAI's image model.
Research midjourney to get a better understanding of the app.

My Requirements:
- It should integrate with the OpenAI APIs. The image model used is gpt-image-1
- The app should have a unified interface with a chat input and a timeline of results
- The timeline should be scrollable and have infinite loading with pagination
- The timeline should be responsive, a grid of 1 on mobile, 2 on tablet and 4 on desktop
- There should be minimal filters on the timeline, with the ability to filter by
  - date
  - status
  - aspect ratio
  - order by newest first or oldest first
- You should be able to download each image by clicking on it
- There should be a details view for the entire prompt which shows:
  - all images for the prompt
  - the jobId
  - created
  - status
  - image count
  - dimensions
  - model
  - quality
  - allow to easily re-run the prompt and download each of the images
- The images should be shown in their correct aspect ratio but within a square container
- You are able to submit the prompt multiple times; more items will be added to the timeline (as background jobs)
- Each prompt can have the following options:
  - quality: (low, mid, high)
  - aspect ratio: 1024x1024, 1536x1024, 1024x1536
  - output_compression ((0-100%)) - default is 50%
  - output_format should be webp
  - moderation should be "low"
  - n (number of images to generate)
  - response_format should be b64_json
  - model should be "gpt-image-1"
- You should be able to see a previous prompt and easily rerun it by clicking on it
- The response images should be stored locally in the browser storage
- You should have a simple navigation bar with a settings button
- In the settings menu you can set your OpenAI API key which is also stored locally in the browser storage
- There is already a codebase using Next.js 15, TailwindCSS, Lucide Icons, React Hook Form with zod and Shadcn UI.

Output as markdown code.
The output will look like this:
# ImgxAI – Concise Functional Requirements

## 1. Core Integration
- **Image Model:** Use OpenAI `gpt-image-1`.
- **API Calls:** Leverage OpenAI Images API with parameters listed in §4.
- **Moderation:** Always submit prompts with `moderation="low"`.

## 2. User Interface
| Area | Requirement |
|------|-------------|
| **Layout** | Unified interface combining a *Chat-style input* (bottom-fixed) and a *Timeline* of results (scrollable grid). |
| **Timeline Grid** | Responsive: 1 col @ mobile (<640 px), 2 cols @ tablet (≥640 px), 4 cols @ desktop (≥1024 px). |
| **Infinite Scroll** | Paginated fetch; auto-load older pages when the user nears bottom. |
| **Filters** | Date range, Status, Aspect Ratio, and Order (Newest ⇆ Oldest). Minimal UI (dropdown / pills). |
| **Image Tiles** | Images display in original aspect ratio inside square thumbnails; click = open **Details View** + download. |
| **Details View** | Shows: full prompt, all images from that prompt, `jobId`, `created`, `status`, image count, dimensions, model, quality. Buttons: **Re-run Prompt**, **Download per image**. |
| **Navigation** | Top bar with app title and *Settings* button (opens modal). |

## 3. Prompt Lifecycle
1. User enters prompt + optional options (see §4).
2. Background job calls OpenAI; placeholder card appears immediately.
3. On completion, card updates with images (stored in browser storage).
4. User may click **Re-Run** on any previous prompt → new job appended to timeline.

## 4. Prompt Options (sent to OpenAI)
| Field | Values / Default |
|-------|------------------|
| `quality` | `"low" | "mid" | "high"` |
| `aspect_ratio` | `"1024x1024" | "1536x1024" | "1024x1536"` |
| `output_compression` | `0–100`, default `50` |
| `output_format` | `"webp"` *(always)* |
| `moderation` | `"low"` *(always)* |
| `n` | Integer ≥1 |
| `response_format` | `"b64_json"` |
| `model` | `"gpt-image-1"` |

## 5. Storage
- **Local Browser Storage**
  - OpenAI API key (from Settings).
  - Generated images (Base-64) & prompt metadata for offline access.
- **Persistence Strategy**
  - Use IndexedDB via a thin wrapper; key by `jobId`.

## 6. Downloading
- Clicking a tile or image in Details triggers client-side `download` of the WebP (respecting `output_compression`).

## 7. Existing Tech Stack Alignment
- **Framework:** Next.js 15 (App Router, React Server Components where appropriate).
- **Styling:** TailwindCSS + Shadcn UI components; Lucide icons for actions.
- **Forms:** React Hook Form + Zod validation for prompt options & settings.
- **State:** React Query or SWR for API calls and cache; Context/Store for global settings.

## 8. Non-Functional
- **Performance:** Lazy-load thumbnails; compress to ≤500 kB each in storage.
- **Accessibility:** Keyboard-navigable timeline, `alt` text from prompt.
- **Responsiveness:** Must operate smoothly on touch devices and desktop.
- **Error Handling:** Clear banner for API/key errors; retry option on failed jobs.
Go through these in detail and ensure there's nothing in there that you don't want.
Keep it as precise as possible.
Next, we'll take this output and create a complete Product Requirements Document.
This will be the input of the task management system.
2. Creating a PRD file (and prompts)
A good PRD file is key to the process. It helps the task management system break down tasks, analyze complexity and understand dependencies between tasks.
Unfortunately, most people don't want to share this prompt ― if you nail this, you got the secret sauce to olympic-level vibe coding. Those people can shove it.
Let me show you. Open up Claude / Anthropic Console, select the claude-sonnet-4-6 model or newer and use this prompt to create a PRD file:
You are an expert technical product manager specializing in feature development and creating comprehensive product requirements documents (PRDs). Your task is to generate a detailed and well-structured PRD based on the following instructions:

<prd_instructions>
{{PRD_INSTRUCTIONS}}
</prd_instructions>

Follow these steps to create the PRD:

1. Begin with a brief overview explaining the project and the purpose of the document.

2. Use sentence case for all headings except for the title of the document, which should be in title case.

3. Organize your PRD into the following sections:
   a. Introduction
   b. Product Overview
   c. Goals and Objectives
   d. Target Audience
   e. Features and Requirements
   f. User Stories and Acceptance Criteria
   g. Technical Requirements / Stack
   h. Design and User Interface

4. For each section, provide detailed and relevant information based on the PRD instructions. Ensure that you:
   - Use clear and concise language
   - Provide specific details and metrics where required
   - Maintain consistency throughout the document
   - Address all points mentioned in each section

5. When creating user stories and acceptance criteria:
   - List ALL necessary user stories including primary, alternative, and edge-case scenarios
   - Assign a unique requirement ID (e.g., ST-101) to each user story for direct traceability
   - Include at least one user story specifically for secure access or authentication if the application requires user identification
   - Include at least one user story specifically for Database modelling if the application requires a database
   - Ensure no potential user interaction is omitted
   - Make sure each user story is testable

6. Format your PRD professionally:
   - Use consistent styles
   - Include numbered sections and subsections
   - Use bullet points and tables where appropriate to improve readability
   - Ensure proper spacing and alignment throughout the document

7. Review your PRD to ensure all aspects of the project are covered comprehensively and that there are no contradictions or ambiguities.

Present your final PRD within <PRD> tags. Begin with the title of the document in title case, followed by each section with its corresponding content. Use appropriate subheadings within each section as needed.

Remember to tailor the content to the specific project described in the PRD instructions, providing detailed and relevant information for each section based on the given context.
Obviously, remember to replace {{PRD_INSTRUCTIONS}} with the output markdown from the previous step.
This is made for Claude, but should work with other LLMs too (I haven't tested it).
The output will look like this:
# ImgxAI - Product Requirements Document

## 1. Introduction

This document outlines the comprehensive product requirements for ImgxAI, a web application that enables users to generate images through OpenAI's image generation API. The PRD serves as a reference for the development team, providing detailed specifications for features, user interface, technical requirements, and design guidelines to ensure consistent implementation of the product vision.

## 2. Product overview

ImgxAI is a user-friendly web application that allows users to create AI-generated images by submitting text prompts to OpenAI's image generation API. The application provides a simple, intuitive interface where users can enter prompts, customize generation parameters, view their generation history in a timeline format, and download the resulting images. ImgxAI emphasizes ease of use, performance, and accessibility while maintaining a minimalist design aesthetic.

## 3. Goals and objectives

### 3.1 Primary goals
- Create a streamlined interface for generating images using OpenAI's `gpt-image-1` model
- Provide users with a persistent timeline of their image generation history
- Enable customization of image parameters while maintaining simplicity
- Ensure responsive performance across all device types
- Deliver a minimalist, accessible user experience

## 4. Target audience

### 4.1 Primary users
- Creative professionals seeking inspiration or assets
- Designers exploring visual concepts
- Content creators needing custom imagery
- Hobbyists experimenting with AI image generation
- Anyone with an OpenAI API key interested in creating images

### 4.2 User needs
- Simple, intuitive interface for prompt submission
- Quick access to previously generated images
- Ability to customize image parameters
- Offline access to previous generations
- Easy downloading of generated images

## 5. Features and requirements

### 5.1 Core integration

| Requirement ID | Requirement | Description | Priority |
|----------------|-------------|-------------|----------|
| CI-101 | Image model integration | Implement integration with OpenAI `gpt-image-1` model | High |
| CI-102 | API call implementation | Configure the application to make calls to OpenAI Images API | High |
| CI-103 | Default moderation | Ensure all prompt submissions include `moderation="low"` parameter | High |

### 5.2 User interface

| Requirement ID | Requirement | Description | Priority |
|----------------|-------------|-------------|----------|
| UI-101 | Unified layout | Implement single-page interface with fixed bottom chat input and scrollable timeline grid | High |
| UI-102 | Responsive timeline grid | Create responsive grid layout: 1 column (mobile), 2 columns (tablet), 4 columns (desktop) | High |
| UI-103 | Infinite scroll | Implement pagination with automatic loading of older results when approaching bottom of scroll | Medium |
| UI-104 | Timeline filters | Add filters for date range, status, aspect ratio, and sort order (newest/oldest) with minimal UI | Medium |
| UI-105 | Image tile display | Show images in original aspect ratio within square thumbnails, with click action to open details view | High |
| UI-106 | Details view | Create modal showing full prompt, all related images, metadata, re-run button, and download options | High |
| UI-107 | Navigation | Implement top bar with app title and settings button | Medium |

### 5.3 Prompt lifecycle

| Requirement ID | Requirement | Description | Priority |
|----------------|-------------|-------------|----------|
| PL-101 | Prompt submission | Allow users to enter text prompts with optional parameters | High |
| PL-102 | Job processing | Process submissions as background jobs with immediate placeholder display | High |
| PL-103 | Result display | Update placeholder with actual images upon job completion | High |
| PL-104 | Re-run capability | Enable users to re-run any previous prompt as a new job | Medium |

### 5.4 Prompt options

| Requirement ID | Requirement | Description | Priority |
|----------------|-------------|-------------|----------|
| PO-101 | Quality selection | Allow selection between "low", "mid", and "high" quality | High |
| PO-102 | Aspect ratio selection | Provide options for "1024x1024", "1536x1024", and "1024x1536" aspect ratios | High |
| PO-103 | Output compression | Enable compression setting between 0-100 with default of 50 | Medium |
| PO-104 | Fixed parameters | Set fixed values for output_format ("webp"), moderation ("low"), response_format ("b64_json"), and model ("gpt-image-1") | High |
| PO-105 | Image count | Allow user to specify number of images to generate (n ≥ 1) | Medium |

### 5.5 Storage

| Requirement ID | Requirement | Description | Priority |
|----------------|-------------|-------------|----------|
| ST-101 | API key storage | Securely store OpenAI API key in browser local storage | High |
| ST-102 | Image storage | Store generated images as Base-64 strings with prompt metadata | High |
| ST-103 | IndexedDB implementation | Use IndexedDB via wrapper for persistent storage, keyed by jobId | High |
| ST-104 | Offline access | Enable access to previously generated images when offline | Medium |

### 5.6 Downloading

| Requirement ID | Requirement | Description | Priority |
|----------------|-------------|-------------|----------|
| DL-101 | Client-side download | Implement client-side download functionality for WebP images | High |
| DL-102 | Compression respect | Apply the specified output_compression setting to downloaded images | Medium |

## 6. User stories and acceptance criteria

### 6.1 User setup and configuration

**ST-101: First-time setup**
- As a new user, I want to set up my API key so I can start generating images
- **Acceptance Criteria:**
  - Settings modal includes field for OpenAI API key entry
  - API key is securely stored in browser storage
  - Validation confirms API key is in correct format
  - User receives confirmation when key is saved successfully

**ST-102: Updating settings**
- As a user, I want to update my API key and preferences when needed
- **Acceptance Criteria:**
  - Settings modal is accessible from the top navigation bar
  - Previously saved API key is displayed (masked) for review
  - Changes are saved only when explicitly submitted
  - User receives confirmation when settings are updated

### 6.2 Image generation

**IG-101: Basic prompt submission**
- As a user, I want to enter a text prompt to generate an image
- **Acceptance Criteria:**
  - Input field is prominently displayed at bottom of screen
  - Submit button or enter key triggers generation
  - Visual indication shows generation is in progress
  - Generated images appear in the timeline upon completion

**IG-102: Advanced parameter configuration**
- As a user, I want to customize image generation parameters
- **Acceptance Criteria:**
  - Options for quality, aspect ratio, compression, and count are available
  - UI clearly indicates current selection and default values
  - Parameter changes persist during the current session
  - Selected parameters are correctly sent with API requests

**IG-103: Error handling**
- As a user, I want to know when an error occurs during generation
- **Acceptance Criteria:**
  - Error messages are clearly displayed when API calls fail
  - Different error types (authentication, content policy, server error) show appropriate messages
  - Options to retry failed jobs are provided
  - Helpful troubleshooting suggestions are included with errors

### 6.3 Timeline and history

**TL-101: Viewing generation history**
- As a user, I want to see all my previously generated images in a timeline
- **Acceptance Criteria:**
  - Timeline displays all past generations in a grid layout
  - Grid is responsive according to device size specifications
  - Images load efficiently with lazy loading implementation
  - Timeline maintains position when returning from detail view

**TL-102: Filtering and sorting**
- As a user, I want to filter and sort my image history
- **Acceptance Criteria:**
  - Filter options for date range, status, and aspect ratio are provided
  - Sort controls allow toggling between newest and oldest first
  - Filtered view updates immediately when selections change
  - Current filter/sort state is visually indicated

**TL-103: Infinite scrolling**
- As a user, I want to seamlessly browse my entire generation history
- **Acceptance Criteria:**
  - Additional history items load automatically when scrolling near bottom
  - Loading indicator appears during pagination fetches
  - Scroll position is maintained when new items load
  - Performance remains smooth even with large history

### 6.4 Image interaction

**II-101: Viewing image details**
- As a user, I want to view detailed information about a generated image
- **Acceptance Criteria:**
  - Clicking an image opens a detail view
  - Detail view shows full prompt text, all related images, and metadata
  - Information includes jobId, creation time, status, dimensions, and other parameters
  - Navigation controls allow browsing between images from the same prompt

**II-102: Downloading images**
- As a user, I want to download generated images to my device
- **Acceptance Criteria:**
  - Download button is available for each image in detail view
  - Downloaded images maintain proper quality based on compression setting
  - Files download in WebP format with appropriate naming
  - Download works on all supported devices and browsers

**II-103: Re-running prompts**
- As a user, I want to re-run previous prompts to get new variations
- **Acceptance Criteria:**
  - Re-run button is available in the detail view
  - Re-running uses the exact same parameters as the original generation
  - New job appears as a separate entry in the timeline
  - Visual indication distinguishes between original and re-run jobs

### 6.5 Edge cases

**EC-101: Offline usage**
- As a user, I want to access my previously generated images when offline
- **Acceptance Criteria:**
  - Previously generated images are viewable when offline
  - Clear indication shows that new generations aren't possible offline
  - Application gracefully handles transition between online and offline states
  - Queued actions are processed when connection is restored

**EC-102: Storage limitations**
- As a user, I want to be able to clear my storage on the settings page

## 7. Technical requirements

### 7.1 Technology stack

The technology stack is already set up, so the requirements below are complete, but use them as a reference to implement the features.

| Requirement ID | Requirement | Description |
|----------------|-------------|-------------|
| TS-101 | Language | Implement using TypeScript for type safety and better developer experience |
| TS-102 | Framework | Use Next.js 15 with App Router and React Server Components where appropriate |
| TS-103 | Styling | Implement styling with TailwindCSS and Shadcn UI components; use Lucide icons for actions |
| TS-104 | Forms | Implement forms with React Hook Form and Zod validation |
| TS-105 | State management | Use React Query or SWR for API calls and caching; implement Context/Store for global settings |

### 7.2 API integration

| Requirement ID | Requirement | Description |
|----------------|-------------|-------------|
| API-101 | OpenAI client | Implement secure client for OpenAI's Images API |
| API-102 | Parameter mapping | Correctly map UI parameters to API request parameters |
| API-103 | Error handling | Implement comprehensive error handling for API responses |
| API-104 | Rate limiting | Add support for managing API rate limits, including user feedback |

### 7.3 Storage implementation

| Requirement ID | Requirement | Description |
|----------------|-------------|-------------|
| SI-101 | IndexedDB wrapper | Implement thin wrapper around IndexedDB for easier data access |
| SI-102 | Data schema | Define schema for storing jobs, images, and metadata |
| SI-103 | Query optimization | Optimize queries for timeline display and filtering |
| SI-104 | Data migration | Support schema migrations for future updates |

### 7.4 Performance requirements

| Requirement ID | Requirement | Description |
|----------------|-------------|-------------|
| PR-101 | Image optimization | Implement lazy loading and appropriate compression for timeline images |

## 8. Design and user interface

### 8.1 Visual design principles

- Minimalist interface focusing on content rather than chrome
- Consistent spacing and sizing throughout the application
- Clean typography with clear hierarchy
- Support for both light and dark modes via TailwindCSS
- High contrast ratio for accessibility
- Visual feedback for all user interactions

### 8.2 User interface components

#### 8.2.1 Main layout
- Single-page application with fixed navigation bar at top
- Chat-style input fixed at bottom of screen
- Scrollable timeline grid occupying main content area
- Modal overlays for details view and settings

#### 8.2.2 Timeline grid
- Responsive grid layout based on device size
- Each cell displays image thumbnail with minimal metadata
- Visual indication of job status (pending, completed, failed)
- Consistent padding and spacing between items

#### 8.2.3 Input area
- Prominent text input for prompt entry
- Expandable panel for additional parameters
- Submit button with appropriate loading states
- Error feedback displayed inline

#### 8.2.4 Details view
- Full-screen modal with close button
- Large image display with navigation between related images
- Complete metadata panel
- Action buttons for download and re-run

### 8.3 Accessibility requirements

- WCAG 2.1 AA compliance for all interface elements
- Keyboard navigation throughout the application
- Screen reader compatibility for all functionality
- Appropriate alt text derived from prompts
- Focus indicators for keyboard navigation

### 8.4 Responsive design specifications

| Breakpoint | Grid columns | UI adjustments |
|------------|--------------|----------------|
| Small (< sm) | 1 column | Simplified options UI, vertical layout |
| Medium (sm - lg) | 2 columns | Compact metadata display, horizontal options |
| Large (> lg) | 4 columns | Full feature display, expanded details view |

### 8.5 Error states and feedback

- Clear error banners for API and authentication issues
- Inline validation for form inputs
- Loading indicators for in-progress actions
- Success confirmations for completed operations
- Helpful guidance for resolving common issues
Similar to the previous step, go through the output and make sure there's nothing in there that you don't want.
Next, we'll use this PRD to generate tasks, subtasks, analyze complexity and set up dependencies between tasks.
3. Setting up the task management system via MCP
In this step, we'll set up the task management system via MCP.
These days, there are a handful of tools that help with AI task management. The most popular ones are:
- Taskmaster AI (prev. Claude TaskMaster)
- Roocode Boomerang Tasks
- Shrimp Task Manager
- Cline Task Tool
- Built your own .md file with task lists and set up rules to run them in Cursor/Windsurf/etc.
I've started by making my own .md file and then gave each of these a shot, trying to build an app. They all work, but the one that I found to be the sweet spot at the moment is Taskmaster AI.
Taskmaster AI has a CLI and is platform/text editor independent. However, it also has support for Cursor & Windsurf and comes with a MCP server too.
The MCP server is great, because you don't need to switch context to a different window and as such can provide task context to your text editor, too.
So let's set up the Taskmaster AI MCP server.
3.1 Installing Taskmaster AI
For this, you'll need an Anthropic API key and a Perplexity API key.
Once you got those, head over to your MCP settings and open up your settings JSON.
In Cursor, that is under Settings > MCP, and then press Add new global MCP server.
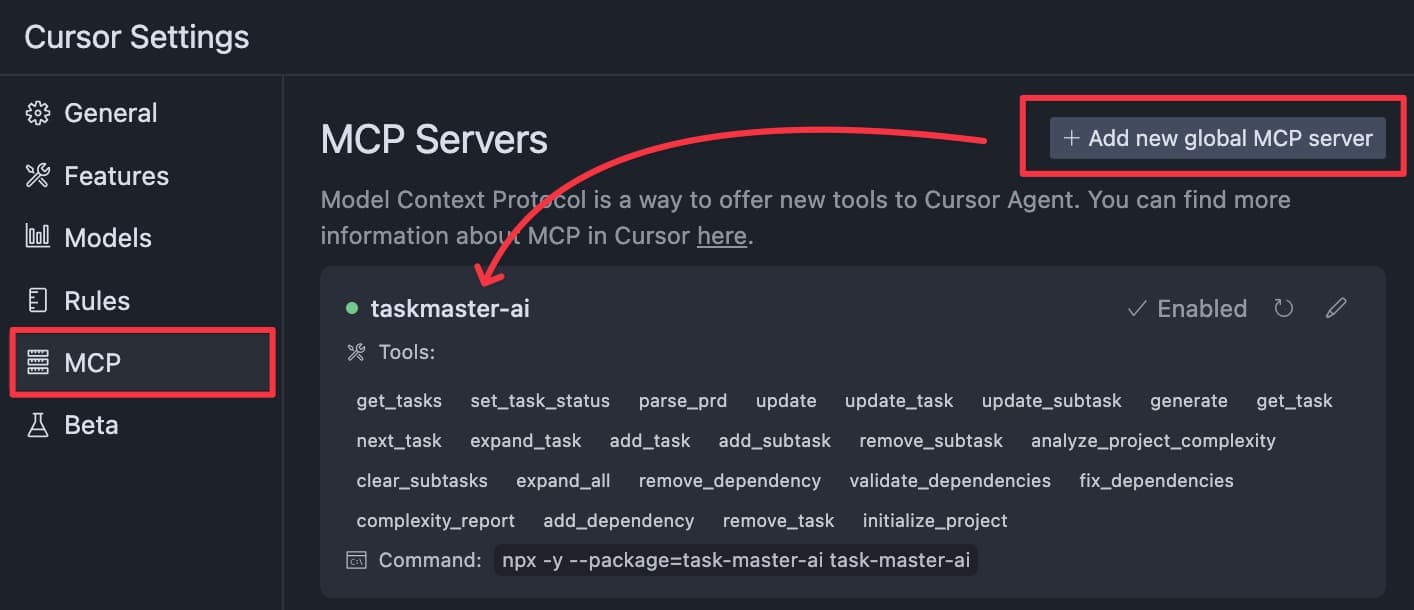
In the MCP settings, drop the following config for the Taskmaster AI server:
{
  "mcpServers": {
    "taskmaster-ai": {
      "command": "npx",
      "args": [
        "-y",
        "--package=task-master-ai",
        "task-master-ai"
      ],
      "env": {
        "ANTHROPIC_API_KEY": "ADD_KEY",
        "PERPLEXITY_API_KEY": "ADD_KEY",
        "MODEL": "claude-sonnet-4-6",
        "PERPLEXITY_MODEL": "sonar-pro",
        "MAX_TOKENS": 64000,
        "TEMPERATURE": 0.2,
        "DEFAULT_SUBTASKS": 5,
        "DEFAULT_PRIORITY": "medium"
      }
    }
  }
}
Hit save, and make sure the server is green. If it's not, press the refresh button and it should spin up.
(optional) Prepping codebase
If you're doing this on an existing codebase, you can just skip this step.
But be warned! ⚠️
Do NOT start from an empty codebase. There will be dragons. And mostly, lots of tokens wasted for a wonky foundation. Use a CLI, your favorite template or just use Shipixen, but whatever you do, do not start from scratch!
Here's what you need in the codebase:
| Feature | Recommended |
|---|---|
| Type checks | TypeScript |
| Linter | ESLint |
| Formatter | Prettier |
| UI components | React/Shadcn UI |
| CSS library | TailwindCSS (AI is just better with it) |
| State management | Zustand |
If you plan to use any database or some sort of API, make sure to also have those set up.
Also, I always add Sentry when I kick off a new project. I just sleep better that way.
3.2 Setting up Cursor Rules
Remember! This is like any other project in Cursor, so you can still add your own rules. Here are some things you should cover in your rules:
- tech stack and versions of libraries
- overall project structure (explaining folder names)
- naming conventions
- style/language preferences
- UI coding preferences
Should be enough to get you started.
By the way, here's a mega-pro tip and the absolute best way to generate Cursor rules.
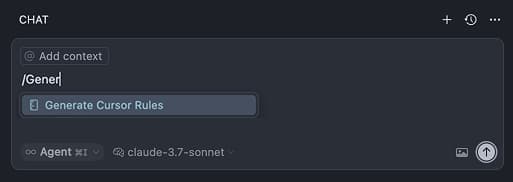
Head over to the Cursor Chat and type
/Generate Cursor RulesThen
@MyFile.tsxor whatever file you want to generate rules for.Prompt it
I want to generate cursor rules for writing UI components. Please analyze the file and outline all the conventions found.
This will create one or more Cursor rule .mdx files that are going to be spot on! (But check them anyway).
If you need more inspiration, Elie Steinbock open source his Cursor rules here.
3.3 Initializing TaskMaster AI
Before getting into this make sure to:
- Select "Agent mode" in your text editor
- Select "Claude Sonnet 4.6" as your model
Now that we have the MCP server & codebase set up, we can initialize TaskMaster AI.
Paste the PRD output from above into a new file under
scripts/prd.txt.In a Cursor Chat, paste the following prompt:
I've initialized a new project with Claude Task Master. I have a PRD at scripts/prd.txt.
Can you parse it and set up initial tasks?
This will transform your PRD file into a series of files (under
/tasks), plus a/tasks/tasks.jsonfile that contains a structured list of tasks, subtasks and metadata.The result will look something like this:

These are not added to Git by default, but I recommend that you do. Just in case the AI goes rogue.
Analyze Complexity. Now, we will ask Taskmaster AI to analyze the complexity of the tasks. This will use Perplexity to do web research and decide on a complexity score from 1-10.
Can you analyze the complexity of our tasks to help me understand which ones need to be broken down further?
The response will look something like this:

You can reply with
Please break down the identified tasks into subtasks.and it will do just that. Remember to say please 😃Further breaking down tasks.
It is also possible to break down individual tasks if you see some that are too complex.
Ideally, you'd break down tasks in units that seem easy to implement to you as a hooman. If somethings seems complex to you, it'll probably be complex for the AI too.Task 3 seems complex. Can you break it down into subtasks?
And that's the setup! You can continue to break down tasks as needed.
If you missed something, don't worry. You can always add tasks later or change direction in the implementation.
Here are some prompt recipes you can use:
add a new taskLet's add a new task. We should implement sorting of the timeline. Here are the requirements: - you should be able to sort the timeline by date - a dropdown should be available to select the sorting direction - the sorting should be persisted when a new page is loadedchange direction of a taskThere should be a change in the image generation task. Can you update task 3 with this and set it back to pending? The image generation should use gpt-image-1 as the model.deprecate a taskTask 8 is not needed anymore. You can remove it.
Not, let's build! (or I should say, let's watch the AI build!)
4. Building the app (prompt loop)
With all this setup done, we are 110% percent ready to let go of the wheel and let the AI do its thing.
This is also the easiest part! Here's what I ended up building:
So, without further ado, here's how you can build something like this too:
Open a new chat in Cursor and prompt it:
Show tasksThis will show you the tasks in a list.

Then, prompt it:
What's the next task I should work on? Please consider dependencies and priorities.This will pick the next task based on dependencies and priority.

Implement the task.
Implement task 2 and all of its subtasks.
Depending on the complexity of the task, you might want to only tell it to implement a single subtask, e.g.
Implement subtask 2.1.Iterate.
After implementing the task, do a smoke test of the UI/app. If it looks good, make a new chat and prompt it:
Show tasksWhat's the next task I should work on? Please consider dependencies and priorities.Implement task X
And that is all there is to it!
One by one, you'll see the app come to life.
In my case, I started with 15 tasks and ended up with 19.
The app turned out to be pretty impressive.
👉 Check it out on Imgx AI.
It's darn pretty impressive, isn't it?!
It was mostly smooth to build, but I still hit some bugs along the way. This is not my first AI rodeo, so I will share some pro tips below on how to get the most out of it.
Thoughts
Let me be honest with you about AI coding.
There's a big myth that needs busting.
All those videos showing AI magically creating perfect apps? They're not completely honest.
While TaskMaster AI systematically breaks tasks down into small increments (which is way better than trying to one-shot an entire complex system), you still need to stay engaged. Yes, AI can write 90% of the code—maybe even more—but you're absolutely still in the driver's seat.
You need to test each feature in the UI, verify it works as expected, and course-correct when things go sideways. It's not usually the code that's the problem, but the behavior.
Think about traditional development: after each incremental change, you do a smoke test to make sure everything's working correctly. The same applies with AI coding.
You simply cannot let AI complete task after task without checking what it's doing and steering it in the right direction when needed.
Your dev skills will still make a difference in such cases.
But darn, you can build some cool things with it. I'm impressed!
Pro tips
1. You can still add extra context to each task run
When prompting the AI to work on the next task, ensure to provide additional context on e.g. UI preferences, API docs etc. You can also attach images!
This will guide it on the path you want to go.
2. Break down files that are large than 500 lines
AI is not great at handling large files. So if you have a file that is larger than 500 lines, break it down into smaller files.
Here's a prompt you can use:
Break down this file into logical modules so it's easier to ready.
Create directories if needed and move utils and interfaces to separate files, maintaining a domain-driven file structure.
3. Bugs are also tasks!
With a complex enough system, you will eventually run into a bug that requires a change to the underlying architecture.
AI will try to apply a superficial fix, but you'll just end up going in circles.
So what you can do is create a new task for the bug and implement it.
Here's a prompt you can use:
The filter feature is not working as expected. Create a new task to fix it:
- the filter should be case insensitive
- it should work with pagination
- it should work with the debounce
4. Always start a new chat when implementing the next task
Sometimes too much context will make things worse. So always start a new chat when implementing the next task.
FAQ
What's an MCP server and why do I need one?
Think of an MCP server as an API that AI Agents can use to enhance their capabilities. There are tons of MCP servers out there, and TaskMaster AI is just one of them. Other cool ones can also integrate with 3rd party APIs.
Check out this massive list of MCP servers.
Can I really build an entire app with AI now?
Yes, and no. Yes — it can write 80–90% of the code. No — you still need to steer the ship, test the UI, debug the weird stuff, and sometimes create new tasks. But the productivity boost is real.
Should I start coding from scratch with AI?
No. Always start from a bootstrapped codebase.
How do I fix bugs introduced by AI?
Treat bugs like tasks. Don't just say “fix it” — describe the bug, what you expected, and how it's failing. Then create a new task and let the AI go at it systematically. If you let it band-aid bugs, you're just kicking the problem down the road.
Why is my task implementation going sideways?
Could be two things: (1) the task is too vague, or (2) your chat context is bloated. Start a fresh chat for each major task, and always rephrase if needed. Be a good PM. The AI will thank you.
Does this scale with a large codebase?
Yes, it does. But you need to keep applying the pro-tips: split large files, break down tasks, and always start a fresh chat.
Furthermore, the bigger the codebase, the bigger the need to give hints of existing modules when you start a new task.
What's the model you used?
I used Claude Sonnet 4.6.
Table of Contents
Authors

- Name
- Shipixen
Previous Article
Next Article
Table of Contents
Authors
- Name
- Shipixen